

Sunday, October 6, 2013
Thursday, October 3, 2013

Tuesday, October 1, 2013

Black Satin Metal Snap Top Frame Purse With Pink Lining

 A better angle of the bag- photo taken with the flash on.
 I had leftover scraps of my bridesmaids dress for her wedding that I used to make a flower pin for the outside of the bag. The scraps weren't big enough to line the interior of the bag, but I was able to find fabric to match.
 Tuesday, September 24, 2013
Off White Silver Metal Snap Frame Wedding Clutch Purse With Singed Flower Pins


I luckily had some heavy duty glue on hand from a bead embroidery project I was working on to attach the frame to the fabric. Getting that just right is probably the hardest part of making the bag.
My sister originally wanted the bag to not sit much below the bottom of the frame, but I think if I did that, it wouldn't hold much.
Now that I have a pattern I drafted and know what to do I'm excited about making a bunch for myself!
Friday, August 23, 2013

Saturday, August 10, 2013

Sunday, May 26, 2013


Tuesday, May 7, 2013
Hand Built Slab Clay Toad Abode Before Firing
 I've been gardening a lot lately so I decided I wanted to make something in pottery that I could put in the yard. I actually broke the top swirl off so I had to fix that (the second one didn't come out as well). This photo was taken before I attached the three sections so they are sitting a little bit off.
Tuesday, April 30, 2013
Tulips From My Garden - I Love Spring!
 While red and yellow aren't my favorite colors, I still love seeing my tulips in bloom- its a great reminder that spring has sprung!
Tuesday, April 23, 2013
Clay Slab Hand Built Pillow Box

Sunday, April 21, 2013
Blue and Pink Bubble Sewn Card Holder
 This is the third card holder I've made from this pattern by 'The Crafty Cupboard'. Its an easy pattern and its a great way to use up extra scraps.

Saturday, March 30, 2013
Crochet Mickey Mouse Baby Hat
 While searching Pinterest a couple of weeks ago, I came accross Repeate Crafter Me's pattern for newborn Mickey and Minnie mouse crochet hats. My husband's cousin just had a little boy and they are into Disney/Mickey so I thought this would be the perfect project. The pattern was very easy to follow and fairly quick to make. I ended up doubling up the ears since they were too floppy when it was only one ear thick. I opted out of adding the white buttons since it looks cute like this and it seems like a safety hazard.
Monday, March 25, 2013
My Magnet Board In My Craftroom With Magnets I've Made
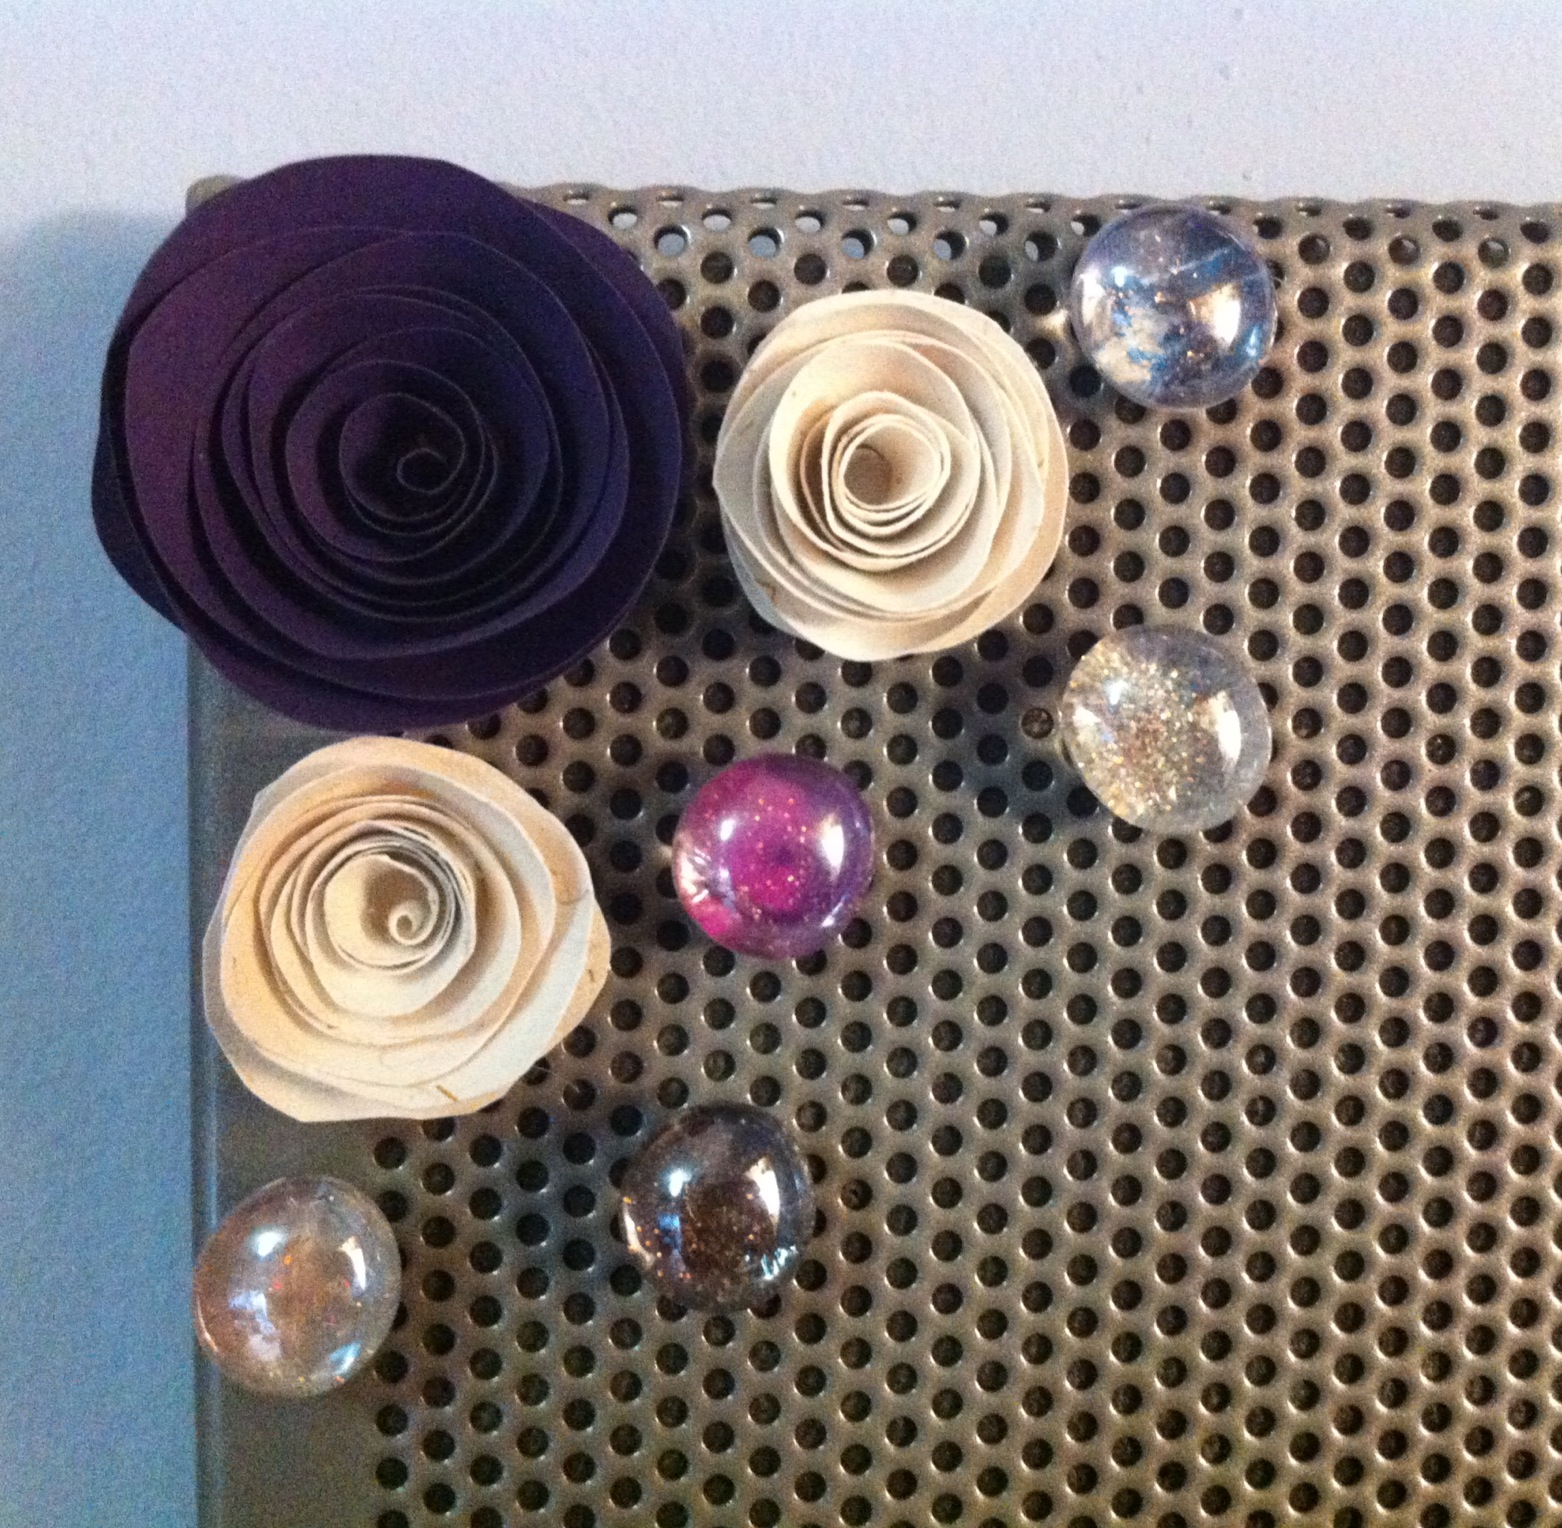 I took a couple of the magnets that I've made from my Spiral Paper Flower Tutorial and my Glitter Domed Glass Magnet Tutorial and updated my magnet board in my craft room. It was getting a little cluttered so I cleared it out except for these in the corner, leaving plenty of room for new crafty items of inspiration.
Thursday, March 21, 2013
My First Mugs Thrown On The Wheel
 I started creating pottery about a year ago, and I am now at the point where I am trying to actually plan beforehand what I want to make on the wheel. Up until now I would take my ball of clay and make whatever came out. One of the first projects I made was a slab built mug. It came out way too large so I've been wanting to make one on the wheel. I made these a couple of months ago and they came out fine but the glaze on both mugs ran (luckily the green one didn't run off the mug like the teal one did). I will probably try to make a mug again, but for now these are doing just fine.
Saturday, March 2, 2013
Sewn Tote Bag Made From Folklore Bag Pattern
 This bag was made from the Folklore Bag Pattern in the book "One Yard Wonders". I modified the pattern a little bit by cutting two pieces for the outer sides of the bag (so the directional fabric wouldn't be upside down on one side). I also attached the top pieces of the bag a little differently than the directions said since it seemed like too much work.
 I made the bag with a quilting weight fabric backed with a light weight fusible interfacing. The pattern said to use a home decor fabric but I loved this fabric and couldn't resist. I think that if I used a cotton fabric again, I'd use a medium weight fusible interfacing.
Wednesday, February 27, 2013

Washi Tape - My newest Craft Purchase

Monday, February 11, 2013
Glitter Colored Domed Glass Magnets Tutorial

I have a couple of magnetic boards in my house (one in my craft room and two over the desk in my kitchen) and I am always looking for different magnets to use on them. I had a couple of bags of flat bottom glass marbles and a ton of old magazines laying around so I decided to make my own magnets. Here's what I did:
Glitter Colored Domed Glass Magnets Tutorial:

- Flat bottom glass marbles
- Old magazines, old kids books, scrapbook paper or any other printed paper
- Glue gun and Glitter glue sticks (if you dont have a glue gun, you could do this with Mod Podge and loose glitter, but I find it easier to use the glue sticks with the glitter already built in- one less step)
- Magnets smaller than the size of the flat bottom marbles you're using
- Scissors
Directions:
- Heat up your glue gun- put a glitter glue stick inside.

Trace the outside of the flat bottom glass marble on the paper you want to make the marble out of. I've found that they are all a little different in shape so I trace each individually. If yours are more uniform then trace another piece of paper/thin cardboard to make a template that you can use instead. -

Cut out the backing just inside the line. - Optional: If you would like to add any embellishments (like a cut out letter on top of the background) glue them (regular craft glue) to the top of the cut out paper now.
-

Put a dab of the glitter glue on the flat side of the glass marble. Attach the paper to the back of the marble (making sure to press from the inside out). 
Once the glue has dried, add another dab of glue to the back of the paper and attach your magnet. 
Enjoy your new magnet!


Sunday, February 10, 2013
Fleece Stuffed Rainbow Star Pillow Sewing Pattern Tutuorial


**If you sell or post any items made from this pattern, please include a link back to my site. (EX- "This item was made from a pattern on Stargazun Designs" ) Thanks!!**
Fleece Stuffed Rainbow Star Pillow Pattern:
Supplies:
- Scraps of 10 colors of fleece
- Pattern Tracing material like Pellon 830 (optional)
- Ruler
- Rotary cutter and mat or Scissors
- Thread (I used a medium tone grey- it seemed to blend the best with all of the colors)
- Hand Sewing Needle
- Sewing Machine
Directions:
- I created a pattern on my pattern tracing material. Measure and cut a piece 2.5in by 10in. On one of the longer sides, mark up 3.5in. Using your ruler, make two cuts by connecting the mark to each of the opposite corners. You should now have a off center triangle like below. (*NOTE* If you don't create a pattern, you can cut each piece of the star like this to get the same result.)

- Cut out two triangles of each of the fabrics. Make sure you cut them opposite- one with the pattern right side up and one with it wrong side up. After cutting, when you line up like sides, the triangles should be right sides together. The easiest way to do this is to fold your fabric in half and cut two pieces at once (which I know is sometimes hard to do with fleece).
- Lay your pieces for one side in whatever order you choose. (Match long sides of the triangle to create a star point. Keep the smallest edges towards the middle of the triangle and match those in between points.) Repeate the same pattern with the pieces of the other side WRONG side up.
- With your fabrics that are right side up, sew along the long edges creating 5 sections of the star (sew them in the order they are in but make sure to keep the seams on the WRONG side of the fabric). Sew the 5 sections together along smallest sides. Repeate with the pieces that were layed out wrong side up (again, keep them in the order they are in but make sure to keep seems on the WRONG side).
- In the center, my sewing wasn't perfect and my edges didn't match up perfectly. I took some thread and needle and hand sewed the pieces together where needed. If you dont want to do this you can put a button in the middle of both sides once the piece is finished to cover up any imperfections.
- Put the two star shaped pieces RIGHT SIDES together. Match colors and pin.
- Sew around the edges leaving a 4in seam opening on one of the edges of the star.
- Clip down points so there isn't a lot of excess fabric. Turn the star right side out making sure to push out points.
- Stuff.
- Hand sew opening closed.
- Enjoy your new pillow!


Wednesday, February 6, 2013
My Two-Tone Crochet Braelet Tutorial featured in CricketLady's 'Learn Crochet' Squidoo Lense
I only recently have ventured onto Squidoo, but I was happy to find that CricketLady had featured one of my bracelet Tutorials on her "Learn Crochet" Lense. It's nice to be featured by other crafters so I want to pay it forward. A couple of blogs I've found recently that I found interesting:
Friday, January 18, 2013
Doodle Calendar from Lemonade Paperie - The Newest Addition To My Board At Work

Sunday, January 13, 2013
Pink Dots Sewn Sequined Flat Bottom Bag

Like this bag, its for sale in my etsy shop.
Thursday, January 10, 2013
Silver Colored Multi Layered Link Bracelet

Sunday, January 6, 2013
Fleece Lamb Stuffed Animal - My First Plushie

If you would like your own, I have one available in my etsy shop.
Wednesday, January 2, 2013
Blue Swarovski Crystal Link Bracelet

Subscribe to:
Posts (Atom)